Showing posts with label Budget Bites. Show all posts

Monday, September 7, 2015

Easy Granny Smith Apple Bacon Provolone Grilled Cheese


So it's been a hot minute since I posted aye!!? I've been a bit of a busy lil bee as of late. Tending my garden, enjoying my greenary, and all that glorious outdoorsy shtuff.

(Meet Johnny Cashew, My loyal chipmunk bud whom apparently loves old pancakes, completely off subject, but toatally cute hehe)
Finding hours to sit down and create a real blog worthy post have just been dang near impossible. Now, with summer winding down, I'm determined to get back in the blog game and share some of these funky lil recipes I've been conjuring up over the past few months. Starting with this twistedly delicious grilled cheese. Purrrrfect for an easy meal when you don't feel like heating up the entire house, but ya still want something that will stick to the ole ribs. Pair this sammy with a nice pasta salad or ear of corn in the summer or with a nice soup or chowder in the winter. She's versatile, lovely and sure to be an EASY fam fav ;)


Whatcha' Need:
  • 1lb bacon (turkey bacon, if you'd prefer)
  • Sliced Provolone or Mozzarella Cheese 
  • 1 or 2 Granny Smith Apple(s)
  • butter
  • thick sliced white bread (would be great on french bread too if your feeling extra fancy lol)
  • Optional Spices: 1/4 tsp each of Chili Powder, Lemon Pepper, Cinnamon, and Italian Blend Spices (salt.... I  find regular bacon, butter/margarine, and provolone cheese to be plenty salty without adding extra salt to the equation, but if using turkey bacon I'd probably add a dash to the mix along with some olive oil)


Start by sprinkling the bacon with your desired dry seasonings and frying or baking it to your kinda crispiness. (The granny smith apple will give it just enough yummy sweetness so I used a few more savory herbs and spices to balance all that sweetness out) Pppersonally, I prefer frying my bacon the old stove top way, because it is easier for me to gather all those beautiful bacon drippings for later use. Also, I find it way easier to monitor more closely each glorious bacon slice progressing to it's done perfection However, if you prefer, go the ole oven route. By frying the bacon I was also able to make this a one dish situation! Score. Just make the sandwiches in that very same pan further increasing that yum factor via bacon drippings infusing into the buttery bread. OH YEAHS :)


Moving on. While the bacon is cooking up, clean, peel, and thinly slice your Granny Smith Apple(s). (I only used one large apple because my fella wasn't down with anything green interfering with his bacon and cheese sandwich, but you might need two if your dealing with a less picky bunch lol. He's not game for trying too many new "weird," food things, but his loss really ;)


Once the bacon is done and cooled, and the apple is ready to roll, drain off most of your excess bacon grease into a sturdy container to save for wonderful recipes later down the cooking line. Place that bacon pan back on the stove, lower the cooking temp, and start prepping your sandwiches. 


Start by slightly buttering one slice of bread. Place it buttered side down in the pan. Then, top it with a slice of provolone, two thin slices of apple, and 3-4 slices of bacon. Butter another piece of bread and place it on top of that yummy layered awesomeness, butter side up. I also like to sprinkle just a dash of dried seasoning on the buttered bread for added yum, which in this case was dried Italian blend and chili powder to carry on that lovely lil flavor profile.


Not thee clearest pic ever, but you get the gist ;)

Cook for about 3-5 minutes and carefully flip with a trusty spatula. Cook another 3-5 minutes on the other side or until golden brown and cheese is melted into that gooey glorious stage.


Just keep'er simple peeps and serve this lil lovely up w/ some chips, a small side salad, or even just a few pickle spears. It's a pretty filling sandwich so no need to over complicate this situation. I hope you enjoy this lil fun, delish twist on thee ole basic grilled cheese. This beaut of a sammy pairs the ever so classic pork and apples combo, but in a fresh, fast and fun new way. Though it's way, way easy and made with fairly simple ingredients, it def won't disappoint on the goodness scale ;) Winner, winner, easy pork and apples dinner.


 Big Hugs and thanks a ton for stopping by! <3


Sunday, March 22, 2015

Easy Chili Dog Mac N' Cheese


If you haven't noticed..... I'm a hardcore dog lover. Not just the furry four legged kind, but hot dogs, brats, Polish sausages, Chicago dogs, Buffalo style (wink, wink here's a link to an easy Buffalo Dog recipe by lil ole me)Buffalo HOT dogs I know they are not the healthiest food in the world, but you know what? We all got to go sometime and someway. Given the various ways one might leave this Earth, death by chili dog doesn't seem like a bad way to go at all! If I do happen to expire eating a chili dog, just find comfort knowing that I went out happy and content!


Way back when I was in high school (seems like eons ago).... I actually worked at a DQ on the Toll Road. This love/hate relationship of mine with the chili cheese dog and Chicago Dog took place there for about 4 years. I ate so0o0 many hot dogs and ice cream products while working there that I didn't want another shake or sausage for at least a year or more after quitting lol! Its been many, MANY of moons since I was dishing up DQ dogs and Oreo blizzards, and I've since, rekindled my mass love for them :) Like they say.... too much of a good thing isn't good. Furthermore, I also lived off of grilled hot dogs and hamburgers every summer as a tot. I'm not exaggerating people. For like three months straight in the summer time, I breathed hot dogs and hamburgers, watermelon, and Popsicles lol. As well as some body's blackberries/mulberries that I'd munch on my adventures to and from the local beach (Those berries were the bomb by the way! They would stain my hands and bare lil nappy feet lol.~ Sorry, for munching on your berries whoever you were he he)


Moving along now to chili dogs and mac n' cheese, who doesn't love that? I know my taste testers gave this 4 thumbs up and confirmed this dishes' deliciousness repeatedly, one even said he'd eat the leftovers cold, so ya know that's winning lol ;) Even better yet, it's way friggin easy (shh) and budget friendly too! But we'll just keep that lil secret between us, kapeesh!? This is sure to be an easy, but yummy family favorite.


Whatcha' Need


  • 1 pack of hot dogs
  • 1 lb of ground turkey (or beef if you prefer, but they'll never know it's not beef hehehe)
  • 1 can chili beans in hot sauce
  • 1 can Sloppy Joe Sauce
  • 1 cup frozen corn kernels (opt)
  • 1 small bell pepper (I used yellow diced, or if you want some heat go jalapeno)
  • 2 boxes deluxe mac n' cheese (prepared according to box directions)
  • 2 tsp dried minced onion (or fresh if you prefer)
  • 2 TBS butter (&or oil / bacon grease; I used a tsp of bacon grease as well) 
  • 1+ tsp each chili powder & oregano
  • 1/2 +/- tsp ground cumin, garlic powder, lemon pepper, and Cajun Seasoning 
  • 1/4 tsp salt

Start by slicing the hot dogs into little medallions, about a half inch or so ought do. Place them into a large sauce pan with a little bacon grease or butter and brown them up. I sprinkled the w/ a dash of the dry seasoning mentioned above as well. Should only take about 7-10 minutes on medium heat for them to brown.


Once the dogs have a nice brown texture on them add the ground turkey, minced onion, diced pepper, and the recommended dry seasonings along w/ the butter. Break down the meat and stir frequently for about 15-20 minutes or until the meat is no longer pink.


~Start water for the mac n' cheese~ but use a large sauce pot because you'll combine all the goodies at the end (and cook according to box directions)


Next, stir into the meat mixture, the sloppy joe sauce, corn, chili beans, and a dash more of the suggested dry seasonings.


Reduce heat just a tad and cover the mixture with lid, stirring occasionally to prevent sticking. Cook for about 15-20 more minutes or until corn & beans are tender and heated all the way thru.

Ohh yeah :)


When the mac n' cheese, and chili dog mixture is all done, turn off the heat and combine them into one lovely, harmonious masterpiece. Sprinkle with crushed corn chips, a dab of sourcream, or a sprinkle of green onions for even more awesomeness! NOW~ Brace yourself for comfort food utopia and chow down!

Hope you dig this funky fun dish, Big Hugs, and Thanks for popping in! 


Friday, March 13, 2015

Zesty Ginger Ale Chicken N' Veggies


SPRING has finally shown her glorious face here in the MW!! Thank heavens, because I was starting to get one serious case of fever folks! That polar vortex rubbish was no joke; it had me feeling all kinds of unmotivated and sluggish. Isn't it funny how just a little sunshine can really brighten our days? I'm feeling all kinds of energized now like my lil' solar battery of a spirit has been fully charged or I just chugged a pot of coffee, jug of soda, and a couple red bulls type of amped up! Fresh air, sunshine, and temps that don't freeze your face give me happy vibes galore. On another positive note, I just welcomed a new fur buddy to my pack, named Quagmire. He's a total ball of too much youngster energy (& a little creep lol)! If puppies can't lift your spirits and put a lil smile on your face and some pep in your step, I don't know that anything can!? FOR REAL, if you don't like puppies just hit the back button now, cuz we can't be pals, seriously though. N.E. WHO < Moving onto this Divine Ginger Ale Chicken, it's so freaking scrumptious peoples! I've seen numerous recipes for Dr.Pepper & Coke Pulled Pork, 7-Up Chicken, and I personally, adore BBQ Root Beer pulled pork, but what about some GINGER ALE MEATS YO?! It seemed like that left out, misfit soda in all these meaty creations on the inter web, so I decided to show it a little love and embrace its' unique gloriousness. PLUS, Ginger Ale just so happened to be on sale for 99 cents a 2 Liter (and whole chickens were on sale as well, so it was like the cosmos wanted me to make this glorious thrifty, chicken concoction for y'all lol)! Move over Dr.Pepper, Coke, and 7-UP, because it's Ginger Ales' time to shine ;)


Whatcha ' Need:

  • 5-7 lb Whole Chicken (mine was slightly over 7lbs, and it will serve many of delish purposes to follow)
  • 2 cups Ginger Ale (more/less depending on size of bird^)
  • 5- 7 med/lg Russet or Idaho potatoes 
  • 1 large onion (diced)
  • 1/2 bag frozen green beans (or 1 can drained)
  • 4 TBS Cold Butter or Margarine (cut into 4 slabs) 
  • 1+ tsp each of lemon pepper, paprika, cumin, & Italian Blend seasoning
  • 1/2tsp +/- garlic powder, oregano, salt, (& Cajun seasoning opt) 

First, gather all the dry spices, and place the recommended or desired amount in a small mixing bowl, and measure out the ginger ale and set it aside. Then lightly grease a large roasting pan w/ non stick cooking spray.


Next, rinse the inside & outside of the chicken in your sink, remove giblets/neck, and pat it dry w/ a paper towel. Place the bird breast side up in the middle of the greased pan.


Now, take the dry spices and rub them all over the outside of the bird, sprinkle inside, carefully, pull up on the chicken breast skin and rub spices underneath the skin as well. (wash those dirty bird hands after touching the raw chicken and b4 touching anything else to prevent spreading the funkies all over the place lol)

Sorry about the awkward view, but this way you can more easily see how I put the spices/butter under the skin as well ;)

Next, cut half a stick of butter into 4~ TBS sized slabs and place them underneath the chicken skin a top the breast region.
Adding butter under the skin makes for a super moist chicken if it's not over cooked ;)


Preheat oven to 350 degrees (F)


Now clean, remove funky spots, and cut the potatoes into nice hearty sized chunks like (6-8 chunks per potato or so). Spread them around the chicken in the pan along with the diced onion. Sprinkle the potatoes w/ a dash of the seasonings used to coat the bird (like 1/4 tsp or so just for extra flavour)


Pour the ginger ale over and inside the bird's cavity and on top of the potato/onion mixture in the pan.

Cover the chicken with aluminum foil and bake for about 1.5 hours depending on the size of the bird.


My chicken was slightly over 7lbs so I baked it for 1 hour and 45 minutes with the foil on. (about 20 minutes per pound is usually a good rule of thumb when making any large chunk of meat in the oven)


I removed the chicken from the oven, uncovered it, and basted it with the yummy pan juices. Then, put in the frozen (or drained can) green beans and placed the chicken back in the oven with the foil off for another 35-45 minutes or so (again depending on the size of your bird).


Many chickens have pop up timers, but they can not always be a great indicator of actual doneness so always test w/ a meat thermometer (and by wiggling the leg on the chicken) The thigh is the thickest part of the chicken, so if the leg seems super jiggly like it could fall right off with a slight tug and the juices are clear then the bird is most likely done, but again, always check with a meat thermometer if unsure, by inserting it in the thigh region of the chicken (not breast).

    
When that beautiful bird is all done let it nap/rest for about 10 minutes before carving into it so the juices will redistribute and you don't end up with a super dry chicken situation (icks lol). Now prepare to rock your world and wow the fam with this easy but SUPER YUMMY, zesty chicken dinner winner!


I hope you dig this dish! Thanks for popping in, and big HUGS!


Friday, February 13, 2015

Easy Cheesy Buffalo HOT dogs


Fast, Easy, and Flavorful were my culinary criteria for dinner yesterday. I was fiercely committed to spending minimal time in the kitchen and pretty much doing as little as possible around my house. Nice goals aye' lol!?! I think we all need relaxing lazy days here and there or we're destined to get burnt out. All work and no play is just no good. I'm not trying to encourage mass laziness by any means, but I do encourage a healthy balance of fun and grind. All work or All play is just unhealthy; we must find/commit to that balance just like with all the other areas of this crazy life. So um yeah, yesterday was my self designated adult play day that was to involve as little work as possible! Which included not fussing over food, just keeping it simple and satisfying. It's not that I don't love cooking up crazy concoctions, because I truly do enjoy it! I find cooking to be a great creative outlet and I GENUINELY... love the pure artistry of making a delicious one-of-a-kind meal and playing with food responsibly (plus, we gotta eat yo's lol)! Like I said though, I needed a nice lazy, low key kinda day to get rebalanced, embrace my inner bum, and just unwind. Does it get any easier or cheaper than prepackaged hot dogs in life (for real though lol)?!? Not much, that's for sure!  However, I wasn't just gonna throw some blah dog in a bun and call it a day, not that I wouldn't go ham on a plain dawg, I just figured since I WAS ONLY making hot dogs for dinner, no sides, no NADA, I'd spunk them up a tad to make it seem more like a gourmet dog while maintaining the minimal fuss philosophy. Thee ol' man said "this might be the best hot dog I've ever had," #mindblown lol! So even with minimal work and effort, my dawg was still able to pack mass flavor and possibly change my dude's life, TOTAL SCORE ;)


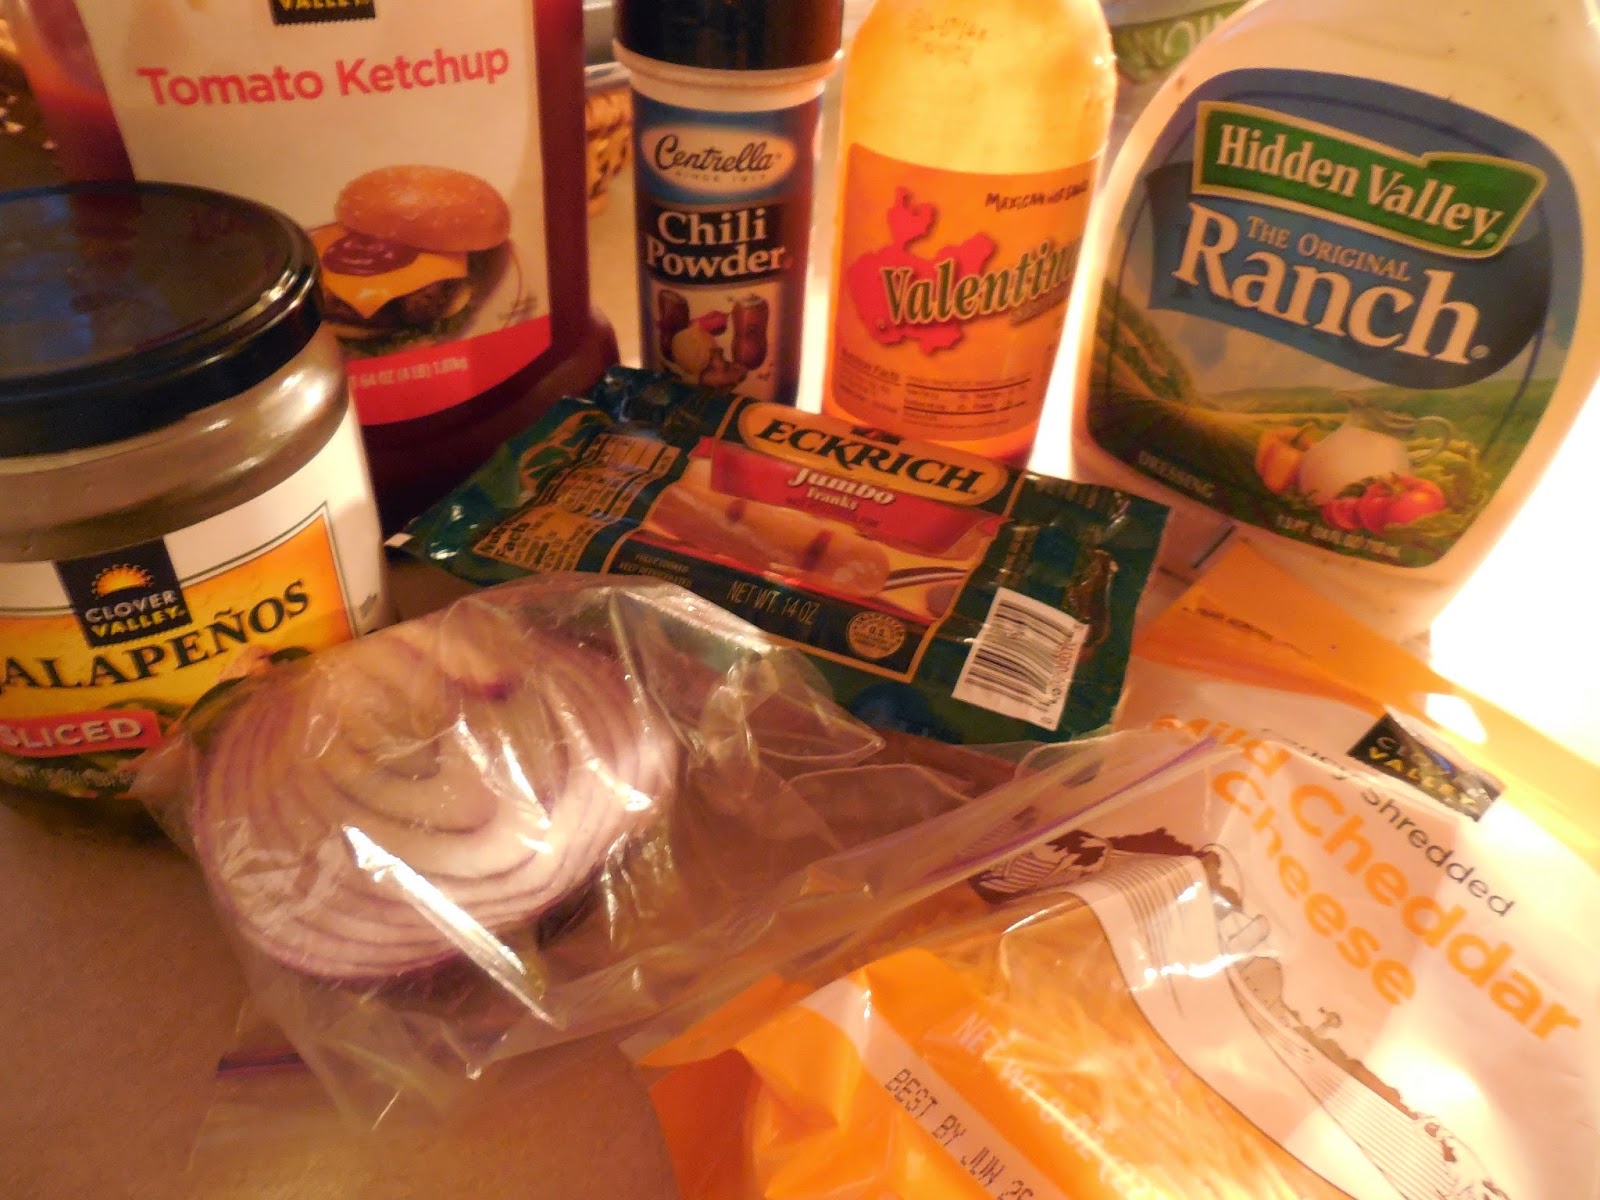
Whatcha' need: 


  • 1 pack hot dogs (I used all beef, but any dog would do)
  • 3-4 TBS of Hot Sauce
  • 2/3-1cup Ketchup
  • Bottled Ranch Dressing (or Blue Cheese, we're not blue cheese folks around here, but use whatever cool, creamy dressing you prefer)
  • 1 cup shredded cheddar cheese
  • 1/2 cup water
  • 1/4 tsp each of oregano, garlic pepper and lemon pepper
  • 1/2 tsp chili powder
  • Hot Dog Buns 
Optional, but highly recommended~ 1/4 cup diced Red Onion and Jarred Jalapeno Slices for garnish


Place the hot dogs and water in a large skillet and sprinkle them with half of the above suggested dry seasonings (approx). Cook over medium heat for about 10-15 minutes or until the dogs swell and all the water has evaporated.


Once the water has vanished, lower the heat slightly and allow the hot dogs to brown up and get crisp on the outside to your desired liking. We prefer them a little darker like they just came off a grill, so I let them brown for about 5-10 minutes, frequently rolling/flipping them about to avoid excessive charring, but still giving them enough space to do their charring thang ;)


Meanwhile, in a small bowl combine the hot sauce, ketchup, and the remaining dry seasonings (easy huh!)


Once the dawgs have the texture and color you like, turn the heat down a tad and smother them in the hot sauce mixture. Try to show all of them equal love and spread them around in the sauce. Rolling and turning them for about 5 more minutes until the sauce is mostly absorbed and they all look well coated.


Then turn off the heat, sprinkle them with the shredded cheddar, and cover those beauts with a lid or plate for about 5 minutes. Just so the cheese can get nice and gooey, and proceed to yumville!


Meanwhile, grab your buns...ranch dressing, and dice up the onion and pepper. Now we construct thee Cheesy Buffalo Dog


Place the gooey cheesy hot dog in the bun, drizzle it with ranch dressing, and sprinkle it with onions and peppers. WHAM BAM! We just made an easy, but fanciful Cheesy Buffalo HOT dog and only dirtied a few dishes! ~ Insert Happy Dances~ This dawg would go great with some mac n' cheese, a baked potato, simple salad or is satisfying enough Ala solo.


Hope you enjoy it as much as we did, cuz' it's pretty doggone good ;) Thanks for Popping In and Big Hugs!